Have different settings for battery or plugged-in
If you recently purchased a laptop and want to fine tune your power settings for different states like plugged in or on battery, then I’ll explain all the different power options available in Windows 7 and Windows 8. Both operating systems have pretty much the same power options, so I’ll use screenshots of Windows 7 for the article.
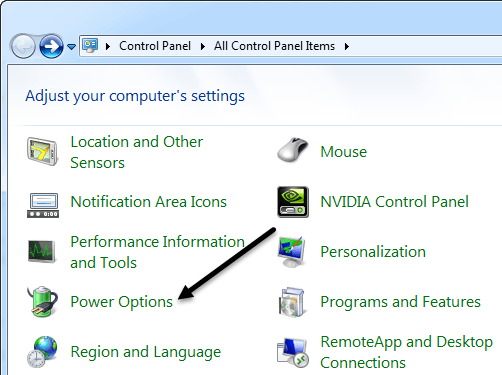
To configure any of the power options, you first have to go to Start, then Control Panel, and then click on Power Options. In Windows 8.1, just right-click on the new Start Button and select Control Panel from there.
Now you’ll be brought to the main Power Options dialog, which put power plans front and center. Microsoft has really simplified this down from the previous power schemes that used to exist in Windows XP and Vista. Now there are two main ones and a third, which is hidden but can be viewed if you click the View additional plans button.
By default, Windows will be set to use the Balanced power plan. You can change that, but first let’s take a look at all the options along the left side.
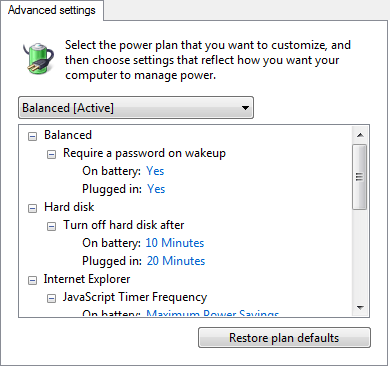
– Require a password on wakeup – This one is pretty self-explanatory, but a little confusing because it depends on whether or not you have a password set for your user account. If you do, then when you come back from sleep or hibernate, you’ll have to enter your password. If you don’t have a password for your user account, then requiring a password here won’t make any difference and you’ll still be able to login, so that’s worth noting.
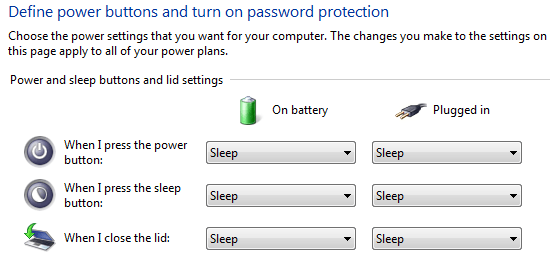
– Choose what the power buttons do – This brings you to the same screen as the previous option, but it’s just the top section. Here you can choose if you want the computer to Sleep or Shutdown or Do Nothing when you press the power or sleep buttons or close the lid. You can choose different options when you’re on battery and when you’re plugged in.
– Choose what closing the lid does – Not sure why this is here because it brings you to the same set of options as above.
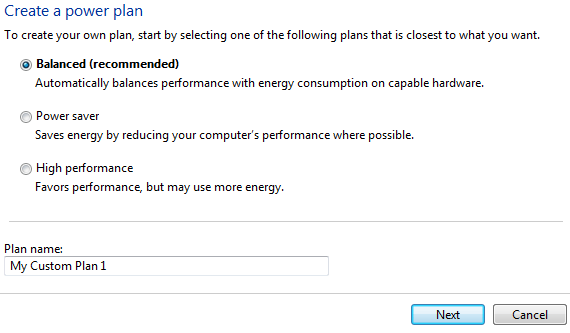
– Create a power plan – If you don’t like the three default power plans or if you want to edit the default settings for one of those three power plans, then this is where you can do it. To create a new plan, give it a name and choose one of the plans as a starting point. Basically, you can adjust the timings for when the computer display turns off and when the computer goes to sleep.
– Choose when to turn off the display – This link will bring you to the same screen that you get to when you click the Change plan settings link next to the currently selected power plan. I’ll explain those options there.
– Change when the computer sleeps – Same set of options as the above link. Will explain below.
Now to actually see what your power settings are, go ahead and click on the Change plan settings link next to the power plan that is currently selected.
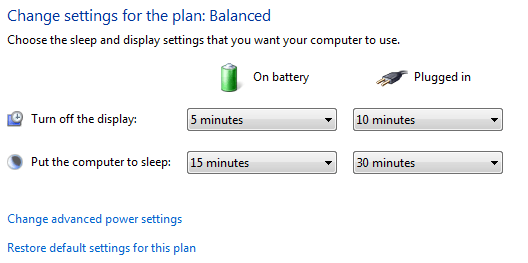
The basic options you can change are when the display turns off and when the computer goes to sleep. For the Balanced plan, the default settings are shown above. To edit more settings, click the Change advanced power settings link.
Here you can pretty much edit all the settings associated with that power plan. Some options are self-explanatory, but some need a little bit of clarification.
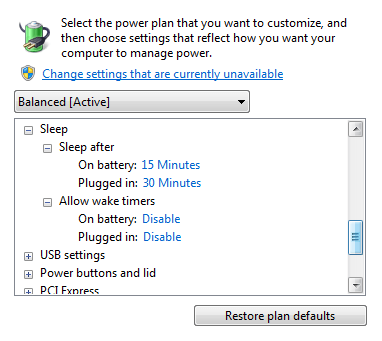
1. Under Hard Disk, you’ll see the option to Turn off hard disk after a set amount of time for battery and power. Note that this is different than the screen before where you chose the time when you wanted the computer to go to sleep. As you can see in my power settings, the hard drives will turn off at 10/20 minutes, but the computer won’t sleep till 15/30 minutes on battery and power respectively. So first the drives will turn off and after a little bit of time, the computer will then go to sleep.
2. Under Wireless Adapter Settings, make sure Maximum Performance is selected for Plugged In.
3. If you’re having issues with your Windows 7 not going to sleep or staying asleep, make sure you Disable wake timers for both battery and power.
4. There is normally no need to mess with certain settings like USB Settings, PCI Express, Processor Power Management and Multimedia Settings unless you really understand the technical aspects.
5. Under Battery, you can adjust what happens to your computer when it reaches certain battery states like Critical, Low, etc. You can also adjust the percentage for those battery states if you like. By default, low is 10% battery left and critical is 5%. You can have the computer go to sleep, hibernate, shut down or do nothing when these different states are reached.
If someone else changed your power settings and you just want to get them back to the default values go ahead and click on the Restore plan defaults button. Also, make sure to click the Change settings that are currently unavailable link at the top to see all power options because some are hidden as they require administrator privileges to change. In my case, I didn’t see any new options, but it depends on the computer.
Hopefully, this will give you enough info on how power options work in Windows 7 and Windows 8 so that you can maximize your battery life when on battery and reduce power usage when plugged in. If you have any question about the power options, leave us a comment. Enjoy!

